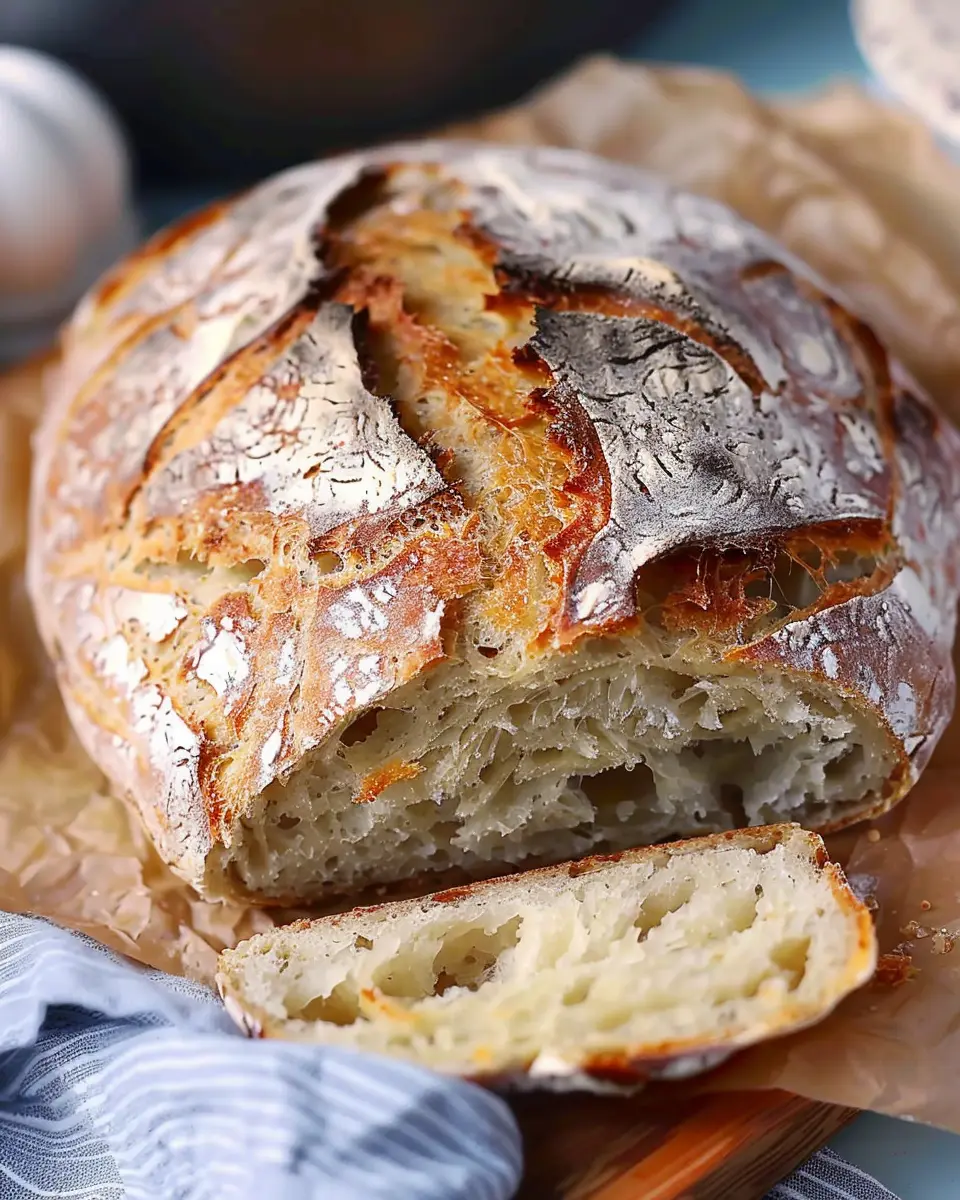
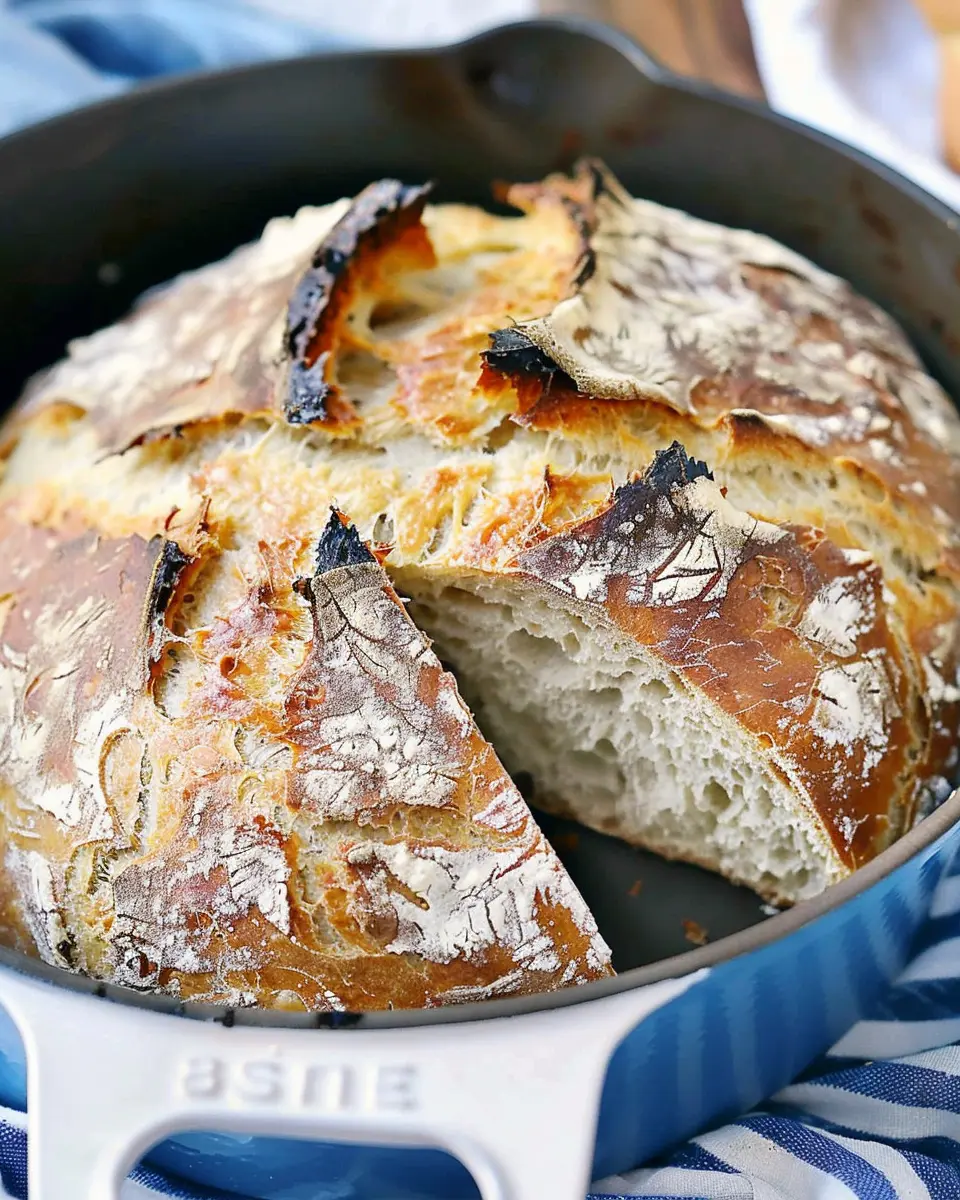
Introduction to Dutch Oven No Knead Bread
There’s something truly magical about bread that’s both warm and fresh from the oven. Dutch Oven No Knead Bread is the perfect recipe for busy young professionals who crave the satisfaction of homemade bread without the hassle of traditional kneading. Imagine inviting friends over for dinner and being able to serve this delightful loaf with minimal effort—sounds ideal, right?
Why No Knead Bread is Perfect for Busy Young Professionals
As a young professional, juggling work, social life, and a thousand tasks can leave little time for complex cooking. Enter no knead bread. This method requires minimal hands-on time, allowing you to prep in the morning, let it rest through your busy day, and just before you wind down, pop it in the oven for a crispy, golden finish.
Here’s why Dutch Oven No Knead Bread is a winning choice:
-
Minimal Effort: With just four basic ingredients—flour, salt, yeast, and water—you’ll find yourself spending less than 10 minutes preparing the dough. No more sore arms or flour explosions!
-
Flexibility: The dough needs to sit for at least 12 hours, making it a perfect companion to your daily routine. Start it before bedtime, and by the next evening, you’ll have delicious homemade bread ready to go.
-
Impressive Results: The high hydration dough creates a moist interior and a crunchy crust. You’ll be amazed at the artisan-like quality of your loaf, yet with minimal skill required.
If you’re curious about the science behind bread-making and want more in-depth knowledge, check out this article on The New York Times Cooking to understand how simple ingredients can transform into something extraordinary.
As you venture into making Dutch Oven No Knead Bread, remember that the process is forgiving. You can always tweak the recipe by adding your favorite herbs or even toasting some Turkey Bacon to serve on the side. How delicious does that sound? So, gather your ingredients, and let’s embark on this effortless culinary journey together!
Ingredients for Dutch Oven No Knead Bread
Essential ingredients for a flavorful bread
Making delicious Dutch Oven No Knead Bread requires just a few simple ingredients that work harmoniously to create that perfect crust and soft interior. Here’s what you need:
- All-purpose flour: The backbone of your bread. It provides the structure.
- Water: Preferably lukewarm, to activate the yeast.
- Salt: Enhances flavor and regulates yeast activity.
- Active dry yeast: This is crucial for the bread’s rise.
These basic ingredients are readily available at any grocery store. When combined, they create a wonderful dough that requires little effort and delivers spectacular results.
Optional ingredients to enhance your loaf
While the essentials are fantastic on their own, consider adding a few optional ingredients to take your Dutch Oven No Knead Bread to the next level:
- Olive oil: For a richer flavor and a slightly softer crumb.
- Herbs and spices: Think rosemary, thyme, or even garlic powder for a savory touch.
- Seeds and nuts: Pumpkin seeds, sunflower seeds, or chopped nuts can add texture and flavor.
- Sweeteners: A touch of honey or sugar can help with browning and add a hint of sweetness.
Mix and match to see what works best for your palate! Want a deep dive into baking tips? Check out King Arthur Baking for expert advice. Happy baking!
Step-by-step Preparation of Dutch Oven No Knead Bread
Making Dutch Oven No Knead Bread is a delightful experience that bridges simplicity with a homemade touch. With just a few ingredients and a little patience, you can create a crusty loaf that’s perfect for any occasion. Let’s break down the steps to ensure that your bread comes out perfectly every time.
Gather Your Ingredients
Before you start, gather everything you’ll need. The beauty of this recipe lies in its simplicity. Here’s what you will need:
- 3 cups all-purpose flour
- 1 ½ teaspoons salt
- ½ teaspoon instant yeast
- 1 ½ cups lukewarm water (about 110°F)
These ingredients are often staples in your kitchen. Using high-quality flour can significantly enhance the flavor.
Mix the Wet Ingredients
In a large mixing bowl, add your lukewarm water. Make sure it’s just warm enough to activate the yeast but not too hot, as an overheated liquid can kill the yeast. Sprinkle in the instant yeast and let it sit for about a minute. This step is essential for kicking off the fermentation process.
Combine the Dry Ingredients
In another bowl, whisk together the flour and salt. It’s important to mix these dry ingredients thoroughly to ensure an even distribution of salt, preventing any overly salty bites in your lovely bread. After your yeast and water are ready, gently add the flour mixture into the wet bowl. Do not stir too much; just combine until you see no dry flour. The dough will look shaggy and sticky, but that’s exactly what you want.
Forming the Dough
Now, it’s time to form the dough into a ball, although you won’t be kneading it as traditional recipes require. Use your hands or a spatula to bring everything together. The key here is to create a cohesive dough without extensive handling. Cover the bowl with plastic wrap or a damp kitchen towel, and let it rest. This gives the yeast a chance to work its magic.
Letting the Dough Rise
Place the covered bowl in a warm spot in your kitchen to rise for 12 to 18 hours. Yes, this is where the “no knead” magic happens! The long rise time is essential because it allows the gluten to develop naturally. You’ll know it’s ready when the dough is bubbly and has doubled in size. Not sure about the perfect temperature? A cozy corner of the counter often works just fine.
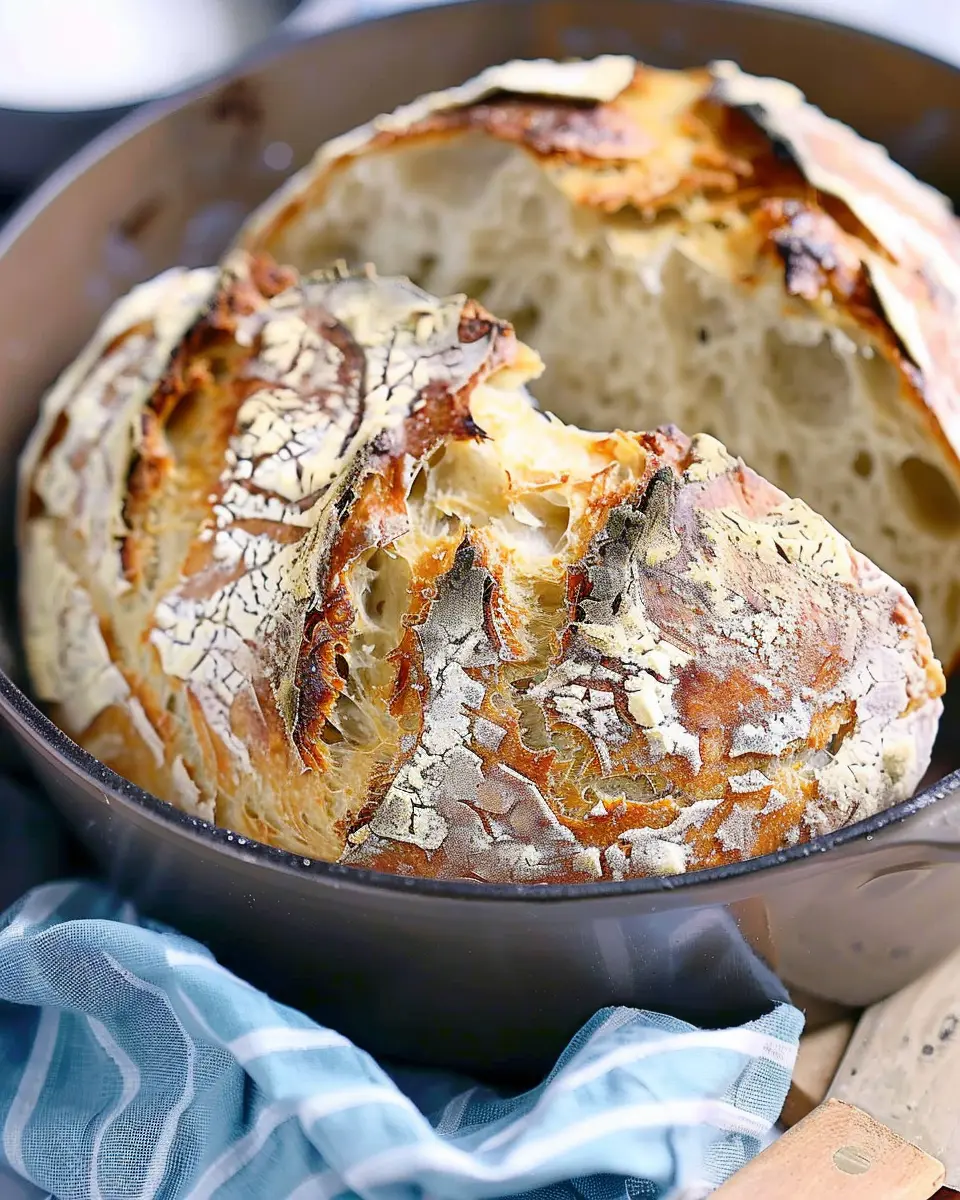
Preheating the Dutch Oven
About 30 minutes before your dough is ready, it’s time to preheat your Dutch oven. Place it (with the lid on) in your oven and heat to 450°F. A hot vessel is crucial for achieving that beautiful crust. If you’re curious about how the Dutch oven works its magic, check out this insightful article on how to use a Dutch oven.
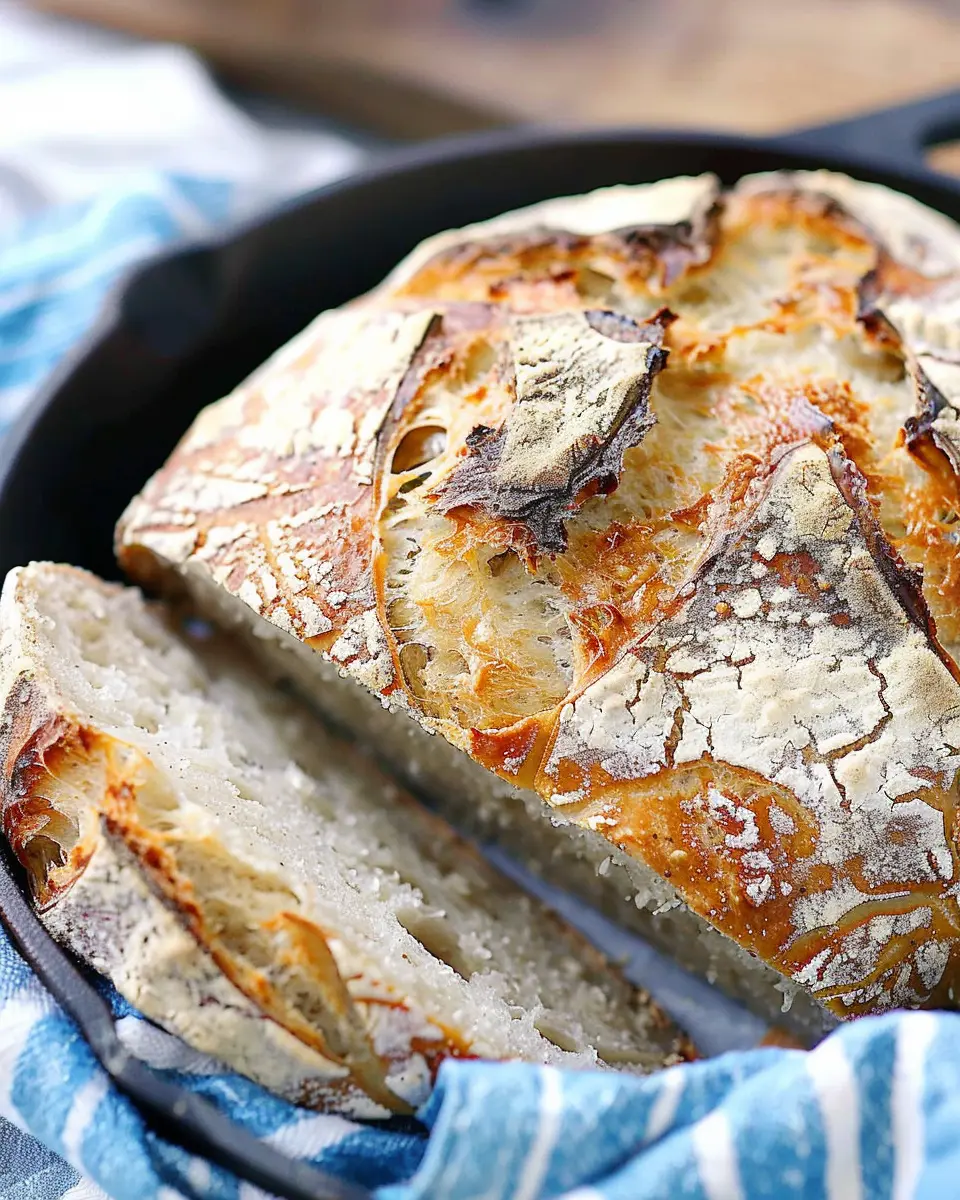
Shaping the Loaf
Once your dough has risen, use a floured surface to turn it out. Gently shape it into a round loaf. Don’t worry about perfection; rustic is what we’re going for! After shaping, cover the loaf with a cloth and let it rest for about 30 minutes while your Dutch oven finishes warming up.
Now that you’re equipped with the knowledge to create Dutch Oven No Knead Bread, all that’s left is to bake it! Once you get the hang of this bread-making process, it’ll quickly become a staple in your cooking repertoire.
Enjoy the delightful aroma that fills your kitchen as the bread bakes, and remember that practice makes perfect — happy baking!
Variations on Dutch Oven No Knead Bread
Creating Dutch Oven No Knead Bread is a delightful experience, and experimenting with variations can elevate this staple to new culinary heights. Let’s explore some exciting ways to personalize your loaf!
Adding Herbs and Spices for Flavor
Elevating your no knead bread with herbs and spices is a simple way to enhance its aroma and taste. Consider incorporating:
- Rosemary or Thyme: These herbs lend a fragrant, earthy quality.
- Garlic Powder or Onion Powder: For a savory punch, add these spices directly into the flour.
- Red Pepper Flakes: A hint of heat can make your bread unexpectedly exciting.
Think about pairing your herbed loaf with a hearty soup or a salad for a satisfying meal. You can find great options for herb blends at McCormick to inspire your flavors.
Incorporating Cheese for a Savory Twist
Who doesn’t love cheese? Mixing in cheese before the final rise can add an irresistible richness. Try:
- Sharp Cheddar: This pairs well with herbs for a classic flavor.
- Parmesan: For a slightly nutty taste, add grated parmesan to your dough.
Experimenting with cheese not only presents a varied flavor profile but also creates delightful little pockets of melted goodness throughout your loaf.
Sweet Variations Featuring Fruits and Nuts
For a sweet twist, consider adding fruits and nuts to your Dutch Oven No Knead Bread. Popular additions include:
- Dried Cranberries or Apricots: These add a touch of sweetness and a chewy texture.
- Chopped Walnuts or Pecans: They provide a satisfying crunch and complement sweet ingredients beautifully.
Mixing in fruits and nuts can transform your bread into a delightful breakfast option or a fantastic pairing with cheese for a charcuterie board.
With these variations, your no knead bread can become a canvas for culinary creativity. Remember, the best part of baking at home is experimenting and finding flavors that resonate with your palate. Happy baking!
Cooking Tips and Notes for Dutch Oven No Knead Bread
Tips for Dough Consistency
When making Dutch Oven No Knead Bread, achieving the right dough consistency is essential. You want a shaggy, wet dough that’s not overly sticky. Adding extra flour can help, but be careful not to go overboard, as too little hydration can lead to a dense loaf. Aim for a dough that holds together but is still loose enough to stretch easily. If it feels too dry, a tablespoon of water can work wonders!
Common Mistakes to Avoid
Many home bakers encounter pitfalls with Dutch Oven No Knead Bread. A common mistake is underestimating the resting time. This dough thrives on time, so let it sit for at least 12 hours! Also, avoid opening the lid of your Dutch oven while baking. This disrupts the steam, which is crucial for that perfect crust. Remember, patience yields the best results!
Storage Tips for Your Bread
To keep your Dutch Oven No Knead Bread fresh, store it in a paper bag at room temperature for up to 3 days. If you want to prolong its life, slice and freeze the bread in portions. Just pop it in the toaster when you’re ready to enjoy a warm slice. For more in-depth guidance on bread storage, check out this excellent resource from King Arthur Baking.
Serving Suggestions for Dutch Oven No Knead Bread
Pairing with Soups and Stews
One of the best ways to enjoy Dutch Oven No Knead Bread is by pairing it with hearty soups and stews. Imagine dipping a crusty slice into a rich chicken noodle or a spicy lentil soup. The bread’s chewy texture complements the warmth of the broth beautifully. Consider trying it with:
- Butternut Squash Soup: The sweetness of the squash pairs well with the slightly tangy crust.
- Beef Stew: The robust flavors of tender beef and vegetables crave a sturdy companion like your homemade bread.
If you’re feeling adventurous, you could even create a bread bowl for your soup!
Creative Toppings for Your Bread
Why settle for plain butter on your Dutch Oven No Knead Bread when there are so many delicious toppings to explore? Here are some fun ideas:
- Turkey Bacon and Avocado: The crispiness of turkey bacon combined with creamy avocado makes a delightful spread.
- Cream Cheese with Smoked Salmon: For a brunch treat, layer cream cheese, smoked salmon, and capers on a warm slice.
- Hummus and Veggies: A healthy option! Spread hummus on your bread and top it with fresh veggies for a satisfying snack.
Embrace creativity in your kitchen and watch your no knead bread become a star player at every meal!
Time Breakdown for Dutch Oven No Knead Bread
When you’re ready to whip up some delightful Dutch Oven No Knead Bread, it helps to know what to expect in terms of time commitment. Here’s a handy breakdown to keep your baking journey smooth and enjoyable!
Preparation time
Getting started takes only about 10 minutes. You’ll mix together the simple ingredients, stir them up, and set your dough aside without any fuss. It’s the easiest part!
Rising time
Now for the waiting game. Let your dough rise for 12 to 18 hours. This long fermentation time is what gives your bread that wonderful flavor and texture.
Baking time
Once the dough has risen, preheat your oven and bake it in the Dutch oven for about 30 to 40 minutes. The aroma will fill your kitchen, making the wait entirely worth it!
Total time
All in all, you’re looking at approximately 12 to 19 hours, largely due to the rising time. But remember, most of that is hands-off. Spend a little time prepping and watch the magic happen while you go about your day!
For more about the science of bread making, check out this article. Happy baking!
Nutritional Facts for Dutch Oven No Knead Bread
When you whip up a delightful loaf of Dutch Oven No Knead Bread, it’s not just about flavor; it’s also about nutrition. Here’s a quick look at the nutritional facts per serving:
Calories per serving
On average, each serving of this no knead bread contains around 150-200 calories. These calories primarily come from carbohydrates, which are essential for energy.
Protein content
Enjoying this homemade bread also provides about 5-7 grams of protein per serving, making it a satisfying addition to your meals. Consider pairing it with toppings like turkey bacon or chicken ham for an extra protein boost!
Sodium levels
With sodium levels typically around 100-200 mg per serving, Dutch Oven No Knead Bread is a moderate choice for those monitoring their salt intake. For more information on sodium guidelines, check the CDC’s nutrition page.
This bread balances convenience with nutrition, making it perfect for busy weeknight dinners or weekend brunches. Just imagine enjoying fresh, warm slices alongside your favorite dishes!
FAQs about Dutch Oven No Knead Bread
Can I use different types of flour?
Absolutely! Dutch Oven No Knead Bread is quite versatile when it comes to flour. While all-purpose flour is a go-to, you can experiment with other varieties like whole wheat or spelt. Just keep in mind that different flours absorb water differently; you might need to adjust the liquid slightly. For instance, whole wheat flour typically requires a bit more hydration to achieve that delightful dough consistency. If you’re feeling adventurous, try adding some herbs or spices to enhance the flavor.
How long can I store this bread?
The good news is that Dutch Oven No Knead Bread stays fresh for a few days. Store it at room temperature in a paper bag or wrapped in a kitchen towel to maintain its crusty exterior. If you want to keep it longer, freezing is a fantastic option! Just wrap the bread tightly in plastic wrap or aluminum foil, then pop it in a zip-top bag. It can last up to three months in the freezer. When you’re ready to enjoy a slice, let it thaw at room temperature and give it a quick warm-up in the oven.
Why is my bread dense or heavy?
Dense or heavy bread can be a common concern, but don’t worry; it’s often easy to diagnose. Here are a few culprits:
- Insufficient rising time: Make sure you’re allowing your dough to rest long enough. The longer, the better!
- Overmixing: When mixing, go gentle. You want just enough action to combine everything.
- Incorrect flour type: As mentioned earlier, certain flours can lead to heavy bread.
If you encounter this issue, consider adjusting your methods next time. Feel free to check out more tips on bread baking science for deeper insights!
Conclusion on Dutch Oven No Knead Bread
Baking your own bread, especially Dutch Oven No Knead Bread, is an incredibly rewarding experience. The aroma fills your kitchen, and the first bite of that warm, crusty loaf is pure bliss. Even if you’ve never baked before, this recipe is so forgiving and simple that you’ll be surprised at the results.
Don’t hesitate to give it a go. Whether it’s for a cozy dinner, a weekend brunch, or as an accompaniment to soups, homemade bread adds a delightful touch to any meal. Embrace the joy of crafting your own bread, and enjoy the process as much as the delicious end product! For more inspiration, check out resources like King Arthur Baking and the Bread Baker’s Guild.
PrintDutch Oven No Knead Bread Recipe: Easy and Delicious Homemade Loaf

Learn how to make a perfect Dutch Oven No Knead Bread with this easy recipe!
- Prep Time: 15 minutes
- Cook Time: 45 minutes
- Total Time: 13 hours
- Yield: 1 loaf 1x
- Category: Bread
- Method: No Knead
- Cuisine: Dutch
- Diet: Vegetarian
Ingredients
- 3 cups all-purpose flour
- 1 teaspoon salt
- 1/4 teaspoon active dry yeast
- 1 1/2 cups warm water
Instructions
- In a large bowl, mix flour, salt, and yeast.
- Add warm water and stir until a shaggy dough forms.
- Cover the bowl with plastic wrap and let it sit for 12-18 hours.
- Preheat your oven to 450°F (230°C).
- Place a Dutch oven inside the oven to heat.
- Once the dough has risen, turn it out onto a floured surface and shape it gently.
- Carefully remove the hot Dutch oven, place the dough inside, cover it, and bake for 30 minutes.
- Remove the lid and bake for an additional 15-20 minutes until golden brown.
- Let it cool before slicing.
Notes
- For a crustier loaf, bake with the lid off for longer.
- Experiment with different flour types for varied flavor.
Nutrition
- Serving Size: 1 slice
- Calories: 120
- Sugar: 0.5g
- Sodium: 300mg
- Fat: 1g
- Saturated Fat: 0g
- Unsaturated Fat: 0g
- Trans Fat: 0g
- Carbohydrates: 24g
- Fiber: 1g
- Protein: 4g
- Cholesterol: 0mg
Keywords: Dutch Oven No Knead Bread