Introduction to Chocolate Dipped Easter Bunny Sugar Cookies
Easter is not just a time for colorful eggs and fluffy bunnies; it’s an opportunity to bring your loved ones together over something sweet and delightful. This year, why not embrace the spirit of the season by creating your own Chocolate Dipped Easter Bunny Sugar Cookies? Baking at home can be a fun experience, allowing you to express creativity and bring joy to your family and friends. But there’s more to it than just the cookies!
Why Celebrate Easter with Homemade Cookies?
When you think of celebrating Easter, store-bought treats may be the first thing that comes to mind. However, homemade cookies are a great way to connect with the holiday’s spirit. Here are a few reasons why whipping up a batch of your own festive delights can elevate your celebration:
-
Personal Touch: Each cookie can be customized to reflect your style, from the shapes to the chocolate finishes. Creating something from scratch feels personal and special.
-
Quality Control: Homemade means you know exactly what goes in — opt for high-quality chocolate, butter, and organic ingredients to ensure each bite is as delicious as possible. Check out resources like The Food Lab for insights into ingredient quality.
-
Shared Experience: Baking together creates lasting memories. Gather your friends or family, and let everyone get involved! It’s a perfect bonding activity as you roll dough, cut shapes, and dip cookies together.
-
Healthier Options: You can control the sweetness and make healthier choices by swapping in alternatives like coconut sugar or adding a bit of whole wheat flour. Explore tips from organizations like the American Heart Association on making healthier baked goods.
Whether you’re a seasoned baker or just starting, the Chocolate Dipped Easter Bunny Sugar Cookies recipe accommodates all skill levels. The luscious chocolate coating and adorable bunny shapes make them a perfect addition to your Easter celebrations, potentially becoming a new family tradition. So grab your apron and get ready to sweeten the holiday with these delightful treats!

Ingredients for Chocolate Dipped Easter Bunny Sugar Cookies
Getting into the spirit of Easter? These Chocolate Dipped Easter Bunny Sugar Cookies are a delightful way to celebrate! Before we dive into baking, let’s gather your ingredients. Here’s what you’ll need:
-
For the Sugar Cookies:
-
2 ¾ cups all-purpose flour
-
1 teaspoon baking powder
-
½ teaspoon salt
-
1 cup unsalted butter, softened
-
1 ½ cups granulated sugar
-
1 large egg
-
2 teaspoons vanilla extract
-
For the Chocolate Coating:
-
12 ounces semi-sweet chocolate chips
-
2 tablespoons coconut oil (for a smoother melt)
-
Decorative Touches:
-
Colorful sprinkles or edible glitter
-
Mini candy eyes (available at craft stores)
As you prep these ingredients, don’t you just feel that excitement for the Easter festivities? If you have an extra minute, check out how the American Baking Guild approaches cookie decorating. It’s a treasure trove of inspiration! So, gather these items, and let’s create some magical bunny cookies together!
Step-by-Step Preparation of Chocolate Dipped Easter Bunny Sugar Cookies
Easter is just around the corner, and what better way to celebrate than with delicious Chocolate Dipped Easter Bunny Sugar Cookies? These sweet, adorable treats not only taste great but add a festive flair to your holiday celebrations. Follow this step-by-step guide, and you’ll be surprised at how easy these cookies are to make!
Gather Your Ingredients
Before diving into baking, make sure you have all your ingredients ready! Here’s what you’ll need:
-
For the cookies:
-
2 ¾ cups all-purpose flour
-
1 ½ teaspoons baking powder
-
½ teaspoon salt
-
1 cup unsalted butter, softened
-
1 ½ cups granulated sugar
-
1 large egg
-
2 teaspoons vanilla extract
-
For the chocolate dipping:
-
12 ounces semi-sweet chocolate chips or melting chocolate
-
Sprinkles or the decorative items of your choice
Having everything on hand makes the process smoother and more enjoyable.
Creaming the Butter and Sugar
In a large mixing bowl, beat the softened butter and granulated sugar together using an electric mixer. Aim for a creamy, fluffy texture that will provide the base for your cookie dough. This step typically takes about 2-3 minutes, but patience is key! The longer you mix, the fluffier the butter mixture will be.
Want to understand why creaming is essential? It incorporates air, resulting in a lighter cookie.
Mixing in the Eggs and Vanilla
Once your butter and sugar are light and fluffy, it’s time to add some flavor! Crack in the egg and pour in the vanilla extract. Beat these ingredients into the mixture until well combined. The egg not only binds the cookies together but also contributes to their rich, moist texture.
Combining Dry Ingredients
In a separate bowl, whisk together the flour, baking powder, and salt. This helps ensure that the leavening agent is evenly distributed throughout the cookie dough. Gradually add this dry mixture to the wet ingredients, mixing on low speed until everything is just combined.
Pro tip: Avoid over-mixing at this stage to keep your cookies tender!
Forming the Dough
Gather the dough into a ball and wrap it in plastic wrap. Chill it in your refrigerator for at least 30 minutes. Chilling helps the dough firm up, making it easier to roll out later, while also enhancing the flavors.
Rolling and Cutting Out Bunny Shapes
Once chilled, on a floured surface, roll the dough out to about ¼ inch thickness. A rolling pin will make this much easier! Use a bunny-shaped cookie cutter to cut out your shapes. If you don’t have a bunny cookie cutter, check out creative ideas for homemade alternatives here!
Baking the Cookies
Preheat your oven to 350°F (175°C) and line your baking sheets with parchment paper. Place your bunny-shaped cookies on the sheets, ensuring a bit of space between them. Bake in the oven for 8-10 minutes or until the edges are lightly golden. The aroma wafting through your kitchen will be heavenly!
Melting the Chocolate for Dipping
While your cookies cool, it’s time to melt the chocolate. In a microwave-safe bowl, heat the chocolate chips in 30-second intervals, stirring in between until smooth. If you’re feeling adventurous, you can even add a teaspoon of coconut oil to make the chocolate dip glossier.
Dipping and Setting the Cookies
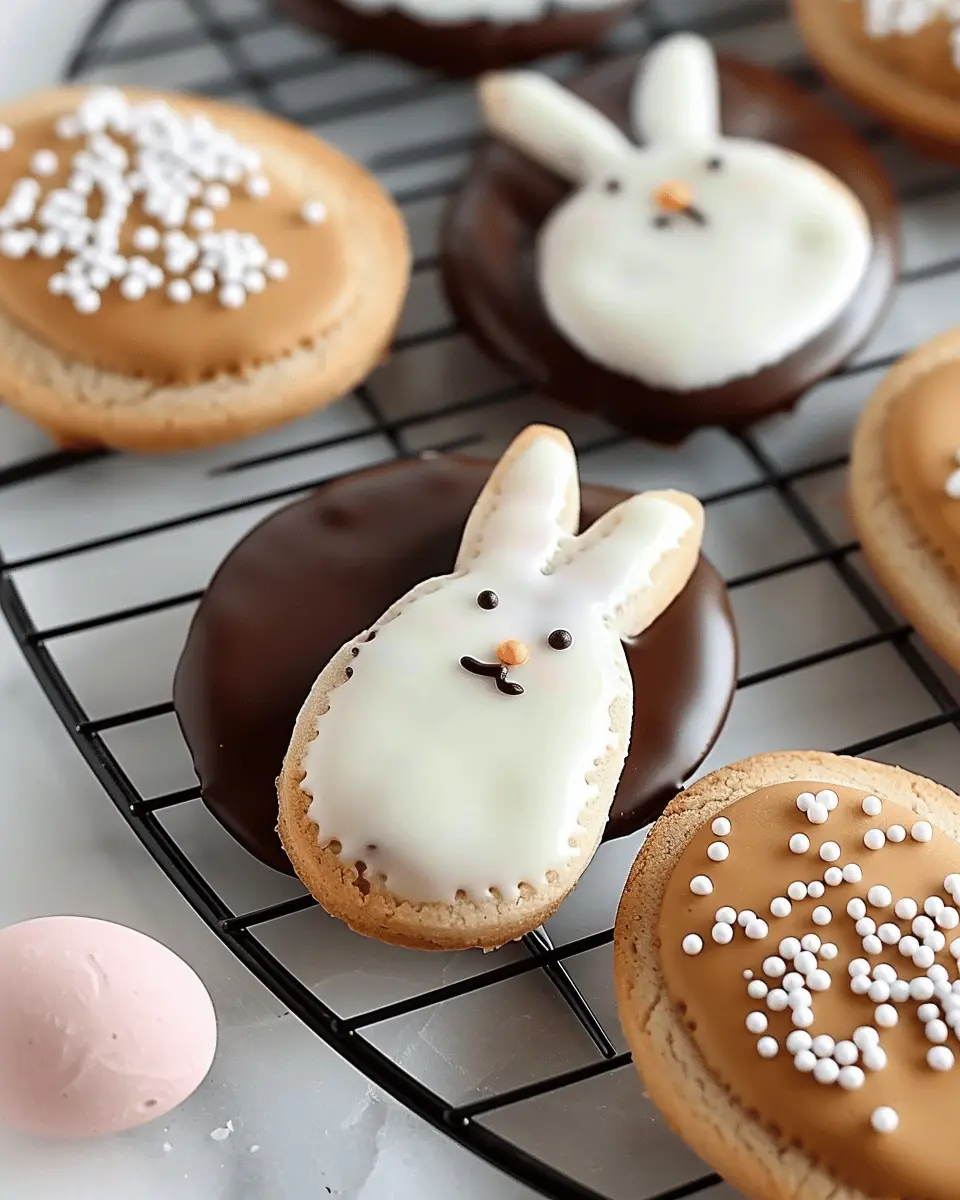
Now the fun begins! Dip the top of each cooled bunny cookie into the melted chocolate. Allow the excess to drip off before placing them back onto parchment paper. If you want to get creative, sprinkle your favorite toppings while the chocolate is still warm. Let the cookies set for about 30 minutes, or until the chocolate hardens completely.
And there you have it! Your Chocolate Dipped Easter Bunny Sugar Cookies are wonderfully delicious and perfect for sharing, gifting, or delighting your family. Enjoy the laughter and joy that comes with baking together. Happy Easter!

Variations on Chocolate Dipped Easter Bunny Sugar Cookies
There’s something magical about Chocolate Dipped Easter Bunny Sugar Cookies. They’re not just a treat; they’re a canvas for creativity! Let’s explore some delightful variations to elevate your cookie game this Easter.
Adding Different Types of Chocolate
While classic milk chocolate is delicious, don’t shy away from experimenting! Consider using dark chocolate for a richer flavor profile. Or how about some white chocolate for a sweet contrast? You could even swirl them together for a beautiful marbled effect. Each type offers its own unique taste and texture, inviting you to discover your favorite combo. If you’re interested in a healthier alternative, why not try unsweetened baking chocolate? Just remember to adjust the sweetness accordingly!
Incorporating Sprinkles or Coconut
A little texture goes a long way! Sprinkles are an excellent choice not only for their color but also for that delightful crunch. Grab some pastel-colored sprinkles to match the Easter theme. Alternatively, shredded coconut can add a tropical flair. Simply dip the cookies in your chosen chocolate and roll them in sprinkles or coconut while they’re still warm. It’s a simple trick that makes your Chocolate Dipped Easter Bunny Sugar Cookies look festive and inviting.
Using Cookie Icing Designs
Want to transform your cookies into works of art? Grab some cookie icing and let your creativity flow. Draw fun patterns or write sweet messages on each bunny. You could even try painting them with edible gold dust for an elegant touch! Using different colors can turn these cookies into personalized gifts or delightful party favors. Your friends and family will appreciate the extra effort, and it’s a fantastic way to channel your inner artist.
By incorporating these variations, your Chocolate Dipped Easter Bunny Sugar Cookies can become just as unique as your Easter celebrations. Happy baking!
Baking Tips and Notes for Chocolate Dipped Easter Bunny Sugar Cookies
Ensuring a Perfect Dough Consistency
Achieving the right dough consistency is pivotal for your Chocolate Dipped Easter Bunny Sugar Cookies. Start by using room temperature butter for smooth mixing. If the dough is too sticky, add a tablespoon of flour at a time until it holds together well. Conversely, overly dry dough can lead to tough cookies—if this happens, try incorporating a splash of milk.
Kneading for just a couple of minutes can improve texture. Be gentle: you want a soft, supple dough that’s easy to roll. Consider chilling it for 30 minutes before rolling for easier handling and sharper cookie shapes.
Common Mistakes to Avoid
- Overmixing: This can result in tough cookies. Blend just until combined.
- Skipping Chilling Time: If you roll out warm dough, your bunnies may lose shape in the oven.
- Underbaking: Cookies often firm up as they cool. Aim for a light golden color for perfect texture.
For additional insights on cookie baking, check out resources like the Cookie Council for expert tips. Enjoy the process—and happy baking!
Serving Suggestions for Chocolate Dipped Easter Bunny Sugar Cookies
How to Present Cookies for Easter Gatherings
When it comes to Chocolate Dipped Easter Bunny Sugar Cookies, presentation is everything! Create a delightful centerpiece by arranging your cookies on a decorative platter, perhaps garnished with fresh spring flowers or colored Easter grass. Wrap them individually in clear cellophane bags tied with pastel ribbons for a charming gift. This not only adds a personal touch but also makes it easy for guests to grab one on the go.
For an extra festive flair, incorporate themed decorations around your serving area. Consider using plates or tablecloths that feature playful bunny motifs. This not only elevates the table setting but also complements the whimsical nature of your cookies!
Pairing Cookies with Alternative Beverages
Wondering what to sip alongside your Chocolate Dipped Easter Bunny Sugar Cookies? Try offering refreshing options like iced herbal teas or fruity lemonades that bring out the cookie’s sweet notes. A light chai latte is another fantastic match, delivering cozy spices that pair wonderfully with the chocolate.
If you’re looking for more unique alternatives, consider crafting a berry-infused sparkling water to add a refreshing twist. Not only do these beverages enhance the cookie experience, but they also cater to everyone in your gathering—because who doesn’t love a good cookie with a great drink?
Time Breakdown for Chocolate Dipped Easter Bunny Sugar Cookies
When planning your festive baking, it’s essential to have a clear timeline. Here’s a quick overview of the time you’ll spend creating these delightful Chocolate Dipped Easter Bunny Sugar Cookies.
Preparation Time
You’ll need about 15-20 minutes to gather your ingredients and whip up the cookie dough. An organized workspace can make this process even smoother, so consider measuring out everything beforehand.
Cooking Time
Pop your cookies in the oven for 10-12 minutes, allowing them to turn golden brown and delicious. Just a note: keep an eye on them, as oven times can vary!
Total Time
From start to finish, expect around 30-40 minutes of fun in the kitchen. This includes prep, bake time, and a moment to let those scrumptious cookies cool before dipping them in chocolate. For a little extra inspiration, check out Taste of Home for more seasonal baking tips!
Nutritional Facts for Chocolate Dipped Easter Bunny Sugar Cookies
When indulging in Chocolate Dipped Easter Bunny Sugar Cookies, it’s great to know what you’re treating yourself to. Here’s a little breakdown of the key nutritional facts to keep you informed.
Calories
Each delightful cookie contains around 150 calories, making it a sweet treat for special occasions without completely derailing your diet.
Total Fat
These scrumptious cookies have about 7 grams of total fat, primarily from the chocolate and butter. Moderation is key, but a little fat never hurt anyone, right?
Sugars
With roughly 10 grams of sugars, these cookies offer just the right amount of sweetness to satisfy your cravings. You might want to pair them with a cup of herbal tea or a refreshing smoothie for a perfect combination.
For more nutrition tips, feel free to check out Healthline’s guide to sugar intake. Understanding how these sweet delights fit into your overall diet can help you enjoy them even more. Happy baking and indulging!
FAQs about Chocolate Dipped Easter Bunny Sugar Cookies
When you’re baking Chocolate Dipped Easter Bunny Sugar Cookies, it’s common to have a few questions. Here are some answers to help you perfect your treat-making journey!
What can I substitute if I don’t have butter?
No butter, no problem! You can use coconut oil, vegetable shortening, or even margarine as alternatives. Each offers a slightly different flavor and texture, so choose one that fits your taste. If you’re dairy-free, coconut oil provides a lovely hint of sweetness and richness. Just make sure to melt it first for easy mixing.
Can I freeze the cookies after baking?
Absolutely! Freezing is a great way to extend the life of your Chocolate Dipped Easter Bunny Sugar Cookies. After they’ve cooled completely, place them in an airtight container or a freezer bag. Just remember to separate layers with parchment paper to prevent them from sticking together. They will stay fresh for up to three months. When you’re ready to enjoy them, thaw at room temperature for the best flavor.
How should I store leftover cookies?
To keep your cookies fresh, store them in an airtight container at room temperature. This will help maintain their sweetness and avoid hardening. If you want to add a little flair, you could include a slice of bread in the container—this helps to keep them soft! Just swap out the bread every few days if it gets stale.
For more tips on cookie storage, check out this helpful guide on proper food storage from the FDA.
These tips should help you enjoy your Chocolate Dipped Easter Bunny Sugar Cookies to the fullest! Happy baking!
Conclusion on Chocolate Dipped Easter Bunny Sugar Cookies
As we wrap up this delightful journey into the world of Chocolate Dipped Easter Bunny Sugar Cookies, it’s clear that these treats are a perfect blend of fun and flavor. Not only do they bring a festive flair to any celebration, but they also make for wonderful gifts or an engaging activity with friends and family.
Creating these cookies allows for personal creativity, whether you decorate them with sprinkles or a drizzle of contrasting chocolate. Believe me, the smiles they bring are worth every minute spent in the kitchen. So grab your ingredients, gather your loved ones, and embark on an Easter baking adventure!
For more inspiration, you might enjoy checking out Baker’s Delight for creative decorating tips or Food Network for more festive recipes. Enjoy your baking!
PrintChocolate Dipped Easter Bunny Sugar Cookies: Easy & Fun to Make
Delight in the deliciousness of these Chocolate Dipped Easter Bunny Sugar Cookies, perfect for celebrating the holiday!
- Prep Time: 20 minutes
- Cook Time: 10 minutes
- Total Time: 30 minutes
- Yield: 24 cookies 1x
- Category: Dessert
- Method: Baking
- Cuisine: American
Ingredients
- 2 3/4 cups all-purpose flour
- 1 teaspoon baking soda
- 1/2 teaspoon baking powder
- 1 cup unsalted butter, softened
- 1 1/2 cups white sugar
- 1 egg
- 1 teaspoon vanilla extract
- 3 cups chocolate chips
- 1 teaspoon vegetable oil
Instructions
- Preheat the oven to 375°F (190°C).
- In a small bowl, stir together flour, baking soda, and baking powder.
- In a large bowl, cream together the butter and sugar until smooth.
- Beat in the egg and vanilla.
- Gradually blend in the dry ingredients.
- Roll rounded teaspoonfuls of dough into balls, and place onto ungreased cookie sheets.
- Bake 8 to 10 minutes in the preheated oven, or until golden.
- Let cool on wire racks.
- In a microwave-safe bowl, melt the chocolate chips and vegetable oil until smooth.
- Dip the cooled cookies halfway into the chocolate and let them set on parchment paper.
Notes
- Use colorful sprinkles on top of the chocolate for decoration.
- Store leftovers in an airtight container for freshness.
Nutrition
- Serving Size: 1 cookie
- Calories: 150
- Sugar: 10g
- Sodium: 50mg
- Fat: 7g
- Saturated Fat: 4g
- Unsaturated Fat: 2g
- Trans Fat: 0g
- Carbohydrates: 22g
- Fiber: 0g
- Protein: 2g
- Cholesterol: 20mg
Keywords: Chocolate Dipped Easter Bunny Sugar Cookies, Easter cookies, sugar cookies, chocolate cookies


